I have wanted to make these little darlings since I first read about them last year! So cute! Since I was bringing mine to a park date with my favorite mommies ever, I skipped the chocolate and royal icing fire in the fireplace and opted to just decorate the mantle. They were a hit with everyone we shared them with because they were equally as tasty as they were adorable! True story!
I do try to avoid using food coloring when I can, though I admit that I always add it to my frostings. To me, it’s just one of those ‘time and a place for everything’ kind of things and I think the time for artificial food coloring is anytime you’re making royal or buttercream icing (though I will also say that I’d never use anything other than Wilton food color gels – if you’re going to do it, you may as well do it right). So in this case, I thought about using beet puree in place of the food coloring, but it would change the texture of the cookie completely and possibly make them unusable. So, food coloring it is!
Loads more cookies coming your way this month, pinky swear.
1 1/4 cups flour
1/3 cup sugar
2 tablespoons cocoa
1/4 teaspoon salt
1/2 cup butter, cubed
1 tablespoon food coloring
green, yellow and red gummy bear hands and feet (just cut the nubs off with kitchen scissors)
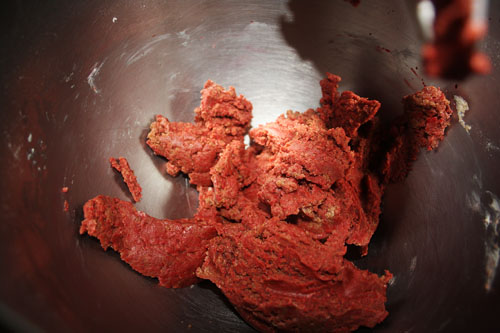
You don’t need me to tell you how to make these, but I will anyway. Ha! Just mix the flour, sugar, salt and cut in the butter with two knives. Usually, like with red velvet cake I strive for beet puree instead of red food coloring but it totally messes with the texture of the cookies. Just use let this be the day you throw food coloring caution to the side, k? Thanks!
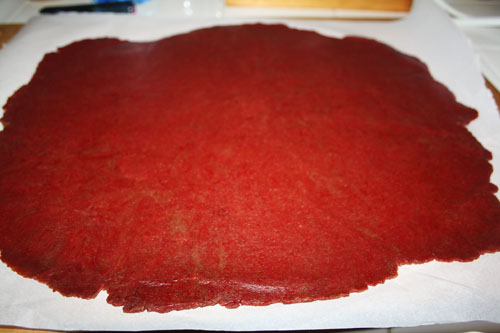
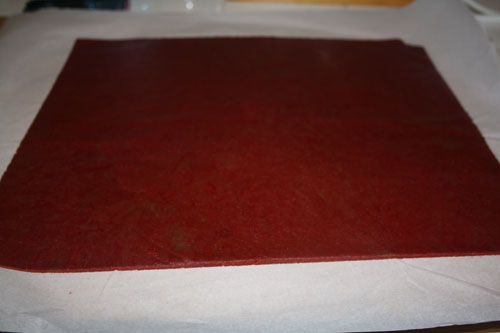
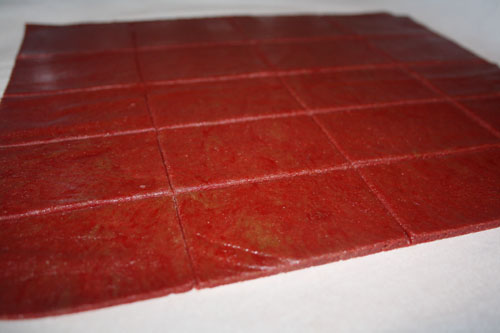
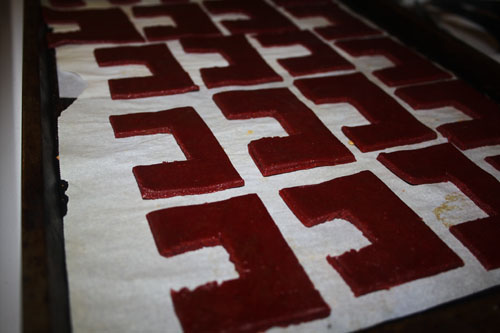
Now roll out the dough to about 1/4″ thick, give or take a little and trim off the edges, then cut into 3″ x 2″ rectangles.
This part is a little tricky, so pop the dough in the fridge for freezer for a few minutes first. Then cut out a smallish square in the middle of the bottom of each rectangle to make a fireplace opening. I made some bigger than others to see how different they’d look after I decorated them! I baked them at 325 for about 15-20 minutes.
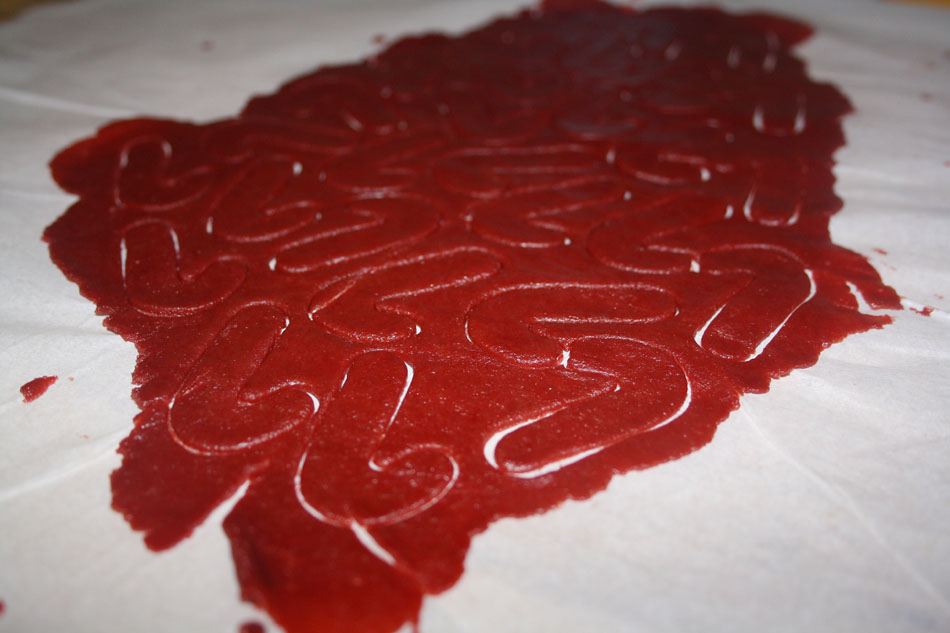
I had some extra dough so I rolled it out and cut out some candy canes!
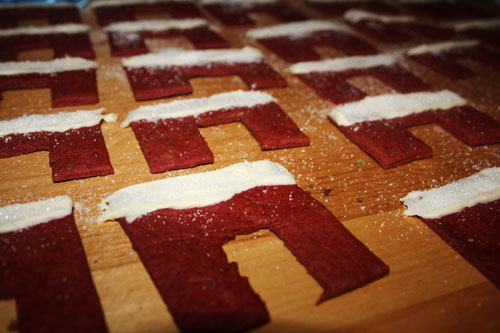
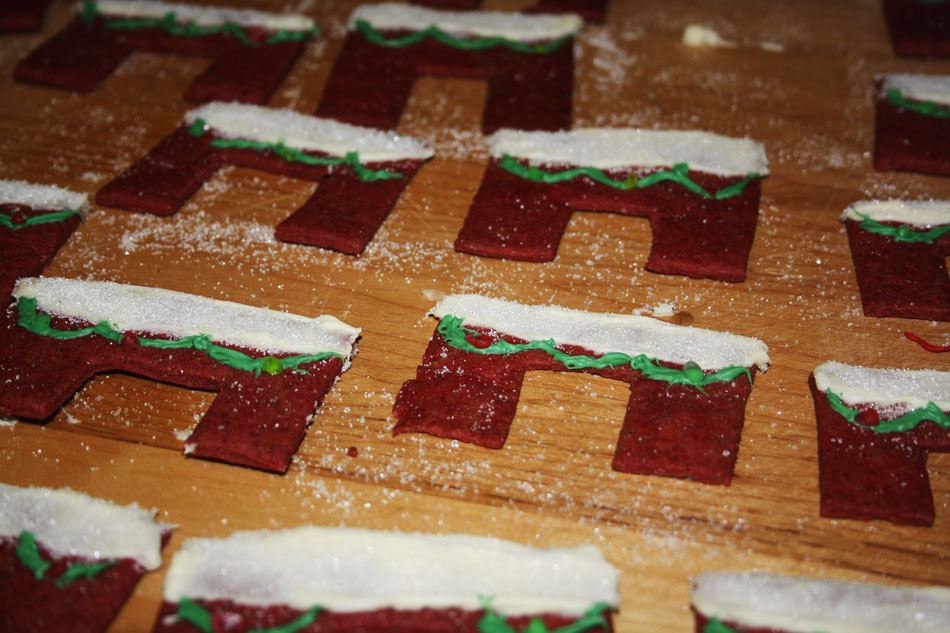
Once they were cool, I dipped the tops in melted white chocolate and then piped melted green chocolate to hang like a string of lights! You could use royal icing, but they’d be a little more delicate that way. I dusted the entire cookie in sanding sugar and attached the gummy bear nubs to the still-wet green chocolate.
There is so much going on today for us that I have no idea where to begin. We ended up spending most of the day on Monday dealing with long distance house selling issues. Please note, however stressfulirritatingmaddeningahem troublesome you think selling a house may be, imagine for a moment that you are about 2600 miles away from it and all cleaning, packing, moving and signing of official documents will be done long distance. Yeah, so that was Monday.
Yesterday was a fun meeting with Wee One #2’s teacher, I really like homeschooling this way. Support from the teacher, freedom to accomplish it our own way and most important the time we all get to have together! Amazing, really. So instead of Twinkle Twinkle’s Halloween party on Monday, we are going this afternoon and the kids are really, really hyped for it. I’m not going to lie, I’m super hyped for it too. It’s my favorite place to take the kids for some fun (and too many Caffe Americanos for mommy).
Today, we attack a stack of cookies and turn the kitchen upside down. It seems the best days around here end in a destroyed kitchen that I then spend a good hour after they’re done cleaning – but it’s totally, undoubtedly, absolutely worth it. <3
This recipe is from a book of activities to do with preschoolers, so you know this cookie is sturdy! They are not horribly chewy, which would be a really weird texture for a cut out cookie, but they are not so tough they're really crunchy either - just perfect. Especially perfect for handing over half the batch to an eager 3 year old and 6 year old with royal icing covered aprons, an arsenal of sprinkles and a whole lot of imagination. They didn't break a single cookie! This is officially my new go-to recipe for cut outs. The only thing to note about them really is that they are not as white as a traditional sugar cookie and the cinnamon and ginger give them a spice cookie taste without being overwhelming.
2 1/2 cups flour
1 teaspoon cinnamon
1/2 teaspoon ginger
1/2 teaspoon baking powder
1/4 teaspoon baking soda
1/4 teaspoon salt
3/4 cup butter
1/2 cup liquid honey
1/3 cup sugar
1 egg
Super super simple, just mix all the dry, then the wet and then the two together! I found they rolled out and baked best when I followed this method: Divide the dough into four balls and roll each one between two sheets of parchment and pop in the freezer for as long as it takes to roll the rest out between their own sheets of parchment. Then take out the first one you put in and cut out the shapes, pop it back in the freezer and repeat that until all four balls are rolled out and cut into shapes. Follow the same process for lifting the shapes onto a baking sheet lined in parchment and rolling and cutting new shapes. Bake at 375 for about 7 minnutes.
The beauty of these is you can cut out whatever shapes you want (or whatever shapes your kids want) and then decorate them in any way you (or more likely your kids) choose – or even better, both! Win-win! I chose ghosts, Wee One #2 chose tombstones (the other two were totally uninterested in what shapes we used). I made my standard Royal Icing (2 large egg whites, 3 cups icing sugar and 1 teaspoon lemon juice). I tinted a little bit black, a whole lot gray and left the rest of it white.
These are among my family’s top 10 favorite Christmas cookies, which is a list that will be rundown at some point next month and even though I’m up to my neck in festive Halloweeny fun right now, these were just begging to be made and posted about! Sometimes, you just have to veer off track and bake a batch of Christmas cookies in the middle of October surrounded with orange and black construction paper and pumpkin seeds. Amiright?! No? That’s just us?
These cookies are good whenever, honest. They are slightly crunchy on the outside (hence the ‘crinkle’) but they are soft and chocolaty on the inside. They are hella addictive though so be sure to share!
2 cups sugar
3/4 cup vegetable oil
3/4 cup cocoa
4 eggs
2 teaspoons vanilla extract
2 1/3 cups all purpose flour
2 teaspoons baking powder
1/2 teaspoon salt
powdered sugar (for rolling)
So first up, mix the sugar and oil and then add in the cocoa until totally combined. Now add the eggs, and vanilla. Sift the flour, baking soda and salt and then stir that into the cocoa mixture. Now pop it in the fridge for a few hours.
Once the dough is solid enough to form into balls, do just that! Make them each with about a tablespoon of dough. Of course you can make them much smaller or bigger depending on what you are making them for and how you want to package them, but you’ll have to adjust the baking time.
Now, whatever size your balls are, roll them in the powdered sugar and place them about 1″ apart (the bigger the balls the more space you need hehe) on a parchment paper lined baking sheet. Smoosh them down with the bottom of a glass before you bake them – for 11-13 minutes at 350 (more or less of course if they are smaller or bigger than a tablespoon each). I am making these for the base of a Halloween cookie so I’ll have festive versions of these babies up soon!
I know some people prefer a crunch with their cookies, and occasionally I’ll make a really crunchy cookie for the kids when they request it, but generally they love their cookies ultra soft. Ginger cookies, chocolate cookies, peanut butter cookies and yes, the beloved chocolate chip cookie are all served up really soft and moist around here (I love the wee bite marks the two littlest ones leave in them when they put them down for a drink). So I’ve been baking up different versions of all kinds of cookies for years to find exactly the right combination to get the right texture. I have succeeded with these babies right here. Normally, I like to know where a recipe came from before I post it on the blog, but in this case I think it was my granny. I found this recipe written on an index card in my kitchen when we unpacked a few months ago, which is really weird because I had to itemize every little thing we brought with us for the border patrol. So I thought I knew everything that was in the bins we brought over. Clearly then, this was the work of kitchen fairies. Let’s not question the kitchen fairies.
2 1/4 cups flour
1 teaspoon baking soda
1 teaspoon salt
1 cup butter, softened
3/4 cup brown sugar
3/4 cups granulated sugar
1 teaspoon vanilla
2 large eggs
2 cups chocolate chips
In typical cookie fashion, sift together the flour, baking soda and salt in one bowl and cream together the butter and sugars in another.
I cream the butter and sugars in the Kitchen Aid and them slowly pour the flour mixture into the butter mixture with the machine on low. Then I take the bowl off the stand and stir the chocolate chips in with a wooden spoon. The wooden spoon makes me feel old school and justifies my ridiculous (and by ridiculous I mean fabulous) apron. Then bake 375 for 9 minutes. The timing is the key to the softness of these guys. They’ll seem borderline mushy, don’t fret. Let them cool on the cookie sheet for a few minutes before you move them to a rack (or a plate) to cool off completely so they don’t stick together in the cookie jar!
Putting these cookies together was no joke! The dough itself was super simple and I will absolutely be making rainbow cookies (ooh maybe rainbow swirl cookies) in the immediate future, the tricky part was in stuffing these cookies. The original recipe used super cute horse cookie cutters to look like actual piñatas. The mood to make these little creations struck me as I was making the Chocolate Kit Kat Cake and all my cute cookie cutters are in Canada. I made due and just sliced them into rectangles and followed the rest of the directions. It’ll work for whatever shape you use really.
1 cup sugar
1 cup powdered sugar
1 cup butter
1 cup vegetable oil
2 eggs
1 teaspoon cream of tartar
1 teaspoon salt
1 teaspoon almond extract
1 teaspoon baking soda
5 cups flour
1 tablespoon vanilla
Mini M&M candies
1/2 cup powdered sugar (frosting)
2 teaspoons milk (frosting)
Nothing out of the ordinary here, cream the butters and the sugar, then add the eggs and oil. Mix the cream of tartar, salt, baking soda and flour. Then add the dry to the wet and blend in the vanilla and almond.
This is where the fun starts! Divide the dough into 5 balls and mix food coloring into each ball until you’ve got the color you’re looking for. If you’re doing this properly you’ll need a very small ball of black dough as well for the feet.
There is a reason there is a container used in the original instructions! The dough is buttery and so of course spready and slippery. Mashing it into a container in layers ensures it’ll hold it’s shape. I? Shaped each layer in a box lid and then crammed the whole thing in a yogurt tube box. Sigh. Next time, proper container.
Freeze this bad boy overnight of possible or at least 4 hours.
Slice the slab into rectangles and bake at 350 for about 12 minutes. Now if you’re using slices you’re done this part, if you’re using a cookie cutter, have at it but make sure you reverse one in three cookies (so when you lay them out you can put the darker sides together and only the pretty sides show). Work quickly while the cookies are still warm.
Mix your frosting ‘glue’ of milk and icing sugar together and then lay two cookies out darker sides up. Spread a little icing glue along the edge of one of the cookies.
Take a third cookie, cut a hole in the middle and place on top of the first cookie with the glue, then fill with mini M&Ms and put more glue along the edge of that cookie and top with the second cookie.
These things are pretty epic, def not for one person!
So, you know how I feel about children in the kitchen. I strongly encourage it and I really think they can learn so much. Obviously, they learn about cooking or baking and they might learn a bit about the dish they’re making, but they also learn a lot about fractions when we double of halve a recipe and they learn a little baking chemistry as well! One day, I’ll gift wrap brand new copies of The Cake Bible and The Pie and Pastry Bible for them to learn all kinds of crazy kitchen chemistry. In the meantime, I’ll assault them with information as we bake. I’ve also noticed that random questions about life pop up when we’re all relaxed and enjoying each other’s company in the kitchen – and that’s always a good thing.
All of the kids love to be in the kitchen. Wee One #2 likes big bakes mostly, like cakes and pies and breads. Wee One #1 likes to cook more than he likes to bake. Wee One #3 though, she shares my affinity for small, quick batch baking. Cookies, cupcakes, muffins, and the like. ‘Teatime Treats’ is usually the chapter of baking books she gravitates towards. When I announced that I wanted to bake up some cookies, she was my first volunteer and this video is the result.
I have tried other chocolate chip cookie recipes, but my Granny’s is just always, always better!
This is her recipe:
2 1/4 cups all-purpose flour
1 teaspoon baking soda
1 teaspoon salt
1 cup butter or margarine, softened
3/4 cup granulated sugar
3/4 cup packed brown sugar
1 teaspoon vanilla extract
2 large egg
1 cup chocolate chips
These cookies don’t mess around. They’re a pretty quick fix when you’re craving a cookie, but they’re impossibly soft and chewy too so you actually put an end to that craving! It helps ease my conscious that they’re vegan of course but also that instead of just being dairy free, they’ve got a dose of the good stuff. You know? It not like there is a zucchini hidden in these babies but there is nutrition in there, so instead of cookies that are not bad for you, these actually qualify as good for you. Hooray!
Again, I will NOT post the recipe because I want to encourage you to buy the book – right here!
This parade of frosted Easter love is especially dear to me because I used my Granny’s vintage cookie cutters to make them! It’s always a little sweet but sad to bake with her kitchen gear – she’s the only person who spent as much time in her kitchen as I do!
Today will be spent exploring a beach we haven’t checked out yet and general family fun on the wholesome end of the spectrum because today we spent the day in Hollywood and while we met Spiderman and the Green Lantern and Wee One #3 got a hug from Diego, we also saw a whole lotta Hollywood, you know? Yoda totally tried to cop a feel! I mean, hello!
Anyhoo, back to Easter. Usually we spent Orthodox Easter with my extended family (all Greeks have seriously huge extended families) however we will be sending long distance love to them this year and celebrating this one out here.
This is yet another recipe from the culinary school cook book I borrowed from my neighbor. 2011 was The Year of the Cookie and I’m still posting cookies I made. Let’s also ignore that 2012 is officially The Year of Soup and I’ve yet to show you any of the soups I’ve made thus far. Ahem.
Much like the other recipes I’ve tried in this book, I felt like a more accomplished domestic goddess as I baked these cookies. There is just something about this book that makes me feel fancy. Julia Child fancy, almost. Almost. I put on my sassy cherry apron while making them to balance out the fancy with ridic to keep the grown-upness in my kitchen to a healthy minimum.
These cookies are so smooth and buttery, as Julia would say ‘it stops your heart just to look at them’.
1 cup unsalted butter, room temp, cut in pieces
1/2 cup sugar
1/2 teaspoon vanilla extract
1/4 teaspoon salt
2 1/2 cups pastry flour
sanding sugar or sugar crystals
Place pieces of butter in your food processor and process until creamy.
Then add the sugar, vanilla and salt and process to blend it together.
Finally, add the flour and process to a smooth dough.
Shape it into a ball and divide that in three. Roll each ball of dough into a 2″ wide log. You may need to pop the dough in the fridge if it gets too soft (nobody likes it when the log goes soft on you). Ahem. Slice cookies from log.
Lay cookies on a parchment paper lined cookie sheet and sprinkle with sanding sugar. Bake at 350F for about 20-25 minutes.
Voila! Look at you all fancy and French and shit. Go watch Marie Antoinette and eat them with wine.
This is the cake to make for people who generally tell you that chocolate cake is ‘too rich’ or ‘too heavy’. It’s also the cake to make for people who complain of cakes being too dry. The buttermilk here makes this cake seriously moist without being too fudgey or puddingy. It’s another winner from one of the first cookbooks my husband ever bought me, yes I’m still working through the Good Housekeeping cookbook – it’s that good.
I have made this cake so many times now that I haven’t been making the Stir and Bake Chocolate Cake that I used to make on the regular. This one is just as easy but even better, I swear.
This is a sidebar example to show how it could look. Customize your sidebar by adding Widgets in WP Admin > Design > Widgets or edit the sidebar files on your own.