Mar 30, 2012
With a Greek mother and a painfully Canadian father (my grandparents from his side are from Saskatchewan and Quebec!) who was more than happy to adopt as much Greek cooking as my mother liked, we ate a lot of pilaf growing up. There is still a lot of pilaf going on over there – and now that Wee One #2 has decided it’s one of her most treasured things to eat, there is a lot of it going on around here as well.
When I was a kid I thought it was tricky, but by the time I was around 13 my Dad showed me how to do it and I’ve been making it since. Easy peasy!
 |
6-8lb roast
2 tablespoons parsley flakes
1 tablespoon paprika
1 teaspoon chili powder
1 tablespoon garlic powder
2 teaspoons black pepper
2 cups water
1/4 cup molasses |
Pilaf
1 onion
3 + cloves garlic
2 tablespoons butter
1 cup rice
2 cups water |
|
|
|
|
Mix all the spices for the rub in a bowl. Rinse off the meat and massage the rub into the meat.
|
|
|
|
|
Mix the water and molasses and pour into the roasting pan with the rubbed pork. Slow cook this baby all day at just under 300F. I went with 270F for about 8 hours or so.
|
|
|
|
|
Let it sit for 30 minutes or so and the shred it.
|
|
|
|
I waited till the pork was sitting before I started the pilaf. Chop the onion and garlic and chase them around a frying pan with the butter, until the onions are clear and the kitchen smells like garlic heaven. Add the water, set the heat to low and don’t touch it for about 30 minutes.
Everyone has their favorites, but pulled pork on a bun with a pilaf?! How can you not win friends with that?! Or have like, three helpings. Not that I’d ever have three helpings. Ha! |
|
|
Mar 29, 2012
Today, I’m linking up with Kate Says Stuff, The How To Mommy and Obviously Marvelous
There are those recipes for 11 layer cakes that wow a room full of friends or a seriously huge batch of stuffing with all the random stuff in it that makes your entire extended family reach for seconds on Thanksgiving, and those recipes are wonderful and certainty have a time and a place (you know, like a going away party or, um, Thanksgiving). But what about like, Wednesday night dinner?
Enter this recipe. This not only always pleases my crowd (all of them at once even!) but if you’re feeling lazy short on time, you can make the filling over a bed of rice for a no hassle, no dough involved meal and make them just as happy. Wee One #1 loves this so much he requests it for lunch on the regular, and I always have to make a separate ‘lunch batch’ because there are never any leftovers. Never.

Chicken Hot Pockets
1 batch pizza dough (or something similar) original recipe used a can of Grands biscuits
2 cups cup cooked chicken, chopped
2 cups condensed cream of chicken soup
1 tablespoon milk
1 teaspoon dried onion, minced
1/2 teaspoon thyme
1/2 teaspoon rosemary
1/4 teaspoon black pepper
1/4 teaspoon poultry seasoning
|
|
|
|
First, deal with the dough, however you choose to do that. Then heat your soup and add all the other ingredients to the pot.
|
|
|
|
However you make the dough, you’ll need to divide it up into individual amounts.
|
|
|
|
|
Then with a little flour (or parchment paper), roll out each pocket and fill with about 1/4 cup of filling.
|
|
|
|
|
Fold it up as carefully as you can and bake them seam side down for about 30 minutes at 375F.
|
|
|
|
Super simple, serious taste punch. I swear it’s the poultry seasoning + thyme combo combo, but really the overall combo of all the spices together with the chicken is a real winner.
|
Mar 27, 2012
I’m linking up with Flock Together Blog Hop and Inspiration Linky Party.
Don’t forget about our giveaway with Keeley Behling Studios! Like the Keeley Behling Studios Facebook page and leave a comment there about something in her Etsy shop to enter. It wouldn’t hurt if you liked the So Very Domestic Facebook page too. 😉
I have made chili from maybe half a dozen recipes over the years, but I had never made cornbread before. These recipes made a heap ton of chili and cornbread. All five of us ate our fill and then the family of five next door ate their fill and there was still some left over!
It’s a liiiiiiiittle spicy, but not too spicy for the kids. A couple of the grown ups said it wasn’t spicy enough, but it’s always easier to add than to take away.
The cornbread is moist and perfect for dipping. It doesn’t fall apart in the chili but it does absorb just enough of the sauce.

Cornbread
1 1/2 cups cornmeal
2 1/2 cups milk
2 cups all-purpose flour
1 tablespoon baking powder
1 teaspoon salt
2/3 cup white sugar
2 eggs
1/2 cup vegetable oil
|
Chili
14.5 ounce can of diced tomatoes with garlic and onion
15 ounce can of chili beans – mild
15 ounce can of black beans
8 ounce can of tomato sauce
15 ounce can of kidney beans
1.5 pounds hamburger
1 onion diced
Pureed spinach
Chili seasoning
Garlic
Salt/pepper |
|
|
|
|
Combine the cornmeal and milk, set aside for 5 minutes. Grease a 9 x 13″ baking dish and whisk together flour, baking powder, salt and sugar.
|
|
|
|
|
Mix in the cornmeal mixture, eggs and oil until smooth. Now pour the batter into the baking dish.
|
|
|
|
Bake for 35 minutes at 400F…and onto the chili!
|
|
|
|
|
Brown the hamburger with the onion and maybe a little garlic. Add the tomato sauce, chili beans, black beans, and kidney beans.
|
|
|
|
|
Add the tomatoes and spices.
|
|
|
|
|
Let it simmer for about 30 minutes and then add the spinach puree. Slow cook it for another hour or so and amaze your neighbors.
|
Mar 26, 2012
Today, I’m linking up with KD Buggie Boutique, Mom Blog Monday and Tough Cookie Mommy for Mingle Monday.
Don’t forget about our giveaway with Keeley Behling Studios! Like the Keeley Behling Studios Facebook page and leave a comment there about something in her Etsy shop to enter. It wouldn’t hurt if you liked the So Very Domestic Facebook page too. 😉
I mentioned a few days ago that I borrowed one of my neighbor’s pro cook books and that I was overcome with joy at the concept of baking and cooking my way through a book he used in culinary school?! Insert dramatic gasping here.
This recipe is from that book and it’s one of those recipes that was so weird I had to try it. I mean, I’ve been around a few kitchens in my day (omg who says that?!) and I’ve never seen this or even heard of it. It was super weird to wrap a roast in a big, heavy (but still pliable) sheet of pastry, but it turned out really well! It was extremely moist and juice. Easy to carve and the kids ate it up and asked for more – always a win in our house!

Salt Dough-Wrapped Roast via The Cook’s Book
1 cup fine table salt
3 cups coarse sea salt
7 cups flour
2 egg whites
2 1/2 cups lukewarm water
large handful of mixed thyme, rosemary, lavender flowers, and sage, chopped
cut of meat, your choice
+ egg wash (2 eggs + about 3 tablespoons water)
|
|
|
|
Mix all but the spices and water in a large bowl. Then stir in the spices.
|
|
|
|
|
Work the dough on a floured surface for a few minutes until it’s smooth. Then wrap it in plastic wrap and let it rest at least 2 hours before rolling it out to wrap your roast in. Season your roast as you normally would, I cut slits in it and poke small pieces of garlic inside. Once your roast is spiced up, wrap the salt dough around it.
|
|
|
|
|
|
|
|
|
Use an egg wash to secure the salt dough around the roast.
|
|
|
|
|
Bake at 400F for about an hour. Let it rest for about 20 minutes after coming out of the oven to it can finish cooking.
|
|
|
|
|
Then crack it open and toss out the crust.
|
|
|
Mar 25, 2012
Don’t forget about our giveaway with Keeley Behling Studios! Like the Keeley Behling Studios Facebook page and leave a comment there about something in her Etsy shop to enter. It wouldn’t hurt if you liked the So Very Domestic Facebook page too. 😉
Everything is better with bacon. Right?! The addition of bacon to pretty much anything I can add bacon to has been mounting. Perogies, check. Breakfast pie, check. Cookies, check. I will post about all these bad boys eventually. The bacon wrapped tater tots are a personal favorite, and have won me over in the hearts of both strangers, neighbors and randos everywhere. This? Is the ‘impress my family’ version, and it totally works.

Bacon Mashed Potatoes
4 baking potatoes
1/4 cup butter
6 strips bacon
1/4 cup Parmesan cheese
|
|
|
|
Bake your potatoes however you like, (I took a shortcut and stuck them in the microwave), then mash them with butter.
|
|
|
|
|
I used my hand blender to make sure there were no chunks and then I added in the bacon.
|
|
|
|
|
Spread the mashed potatoes in a casserole dish and sprinkle the cheese over top. Bake at 375F for about 20 minutes.
|
Mar 20, 2012
Eastside Food Bites, The Curvy Carrot, What’s Gaby Cooking, Smells Like Home, Mel’s Kitchen Cafe, all of these blogs are conspiring against me to fill me with salty carbs. The easy to follow and execute recipes and the beautiful photography totally worked on me. I made these first for a few of my girlfriends who came up to the woods for an afternoon of acting like kids and swimming in the lake by our house. They were amazing, and we polished them off on one sitting. Then I made them a few months later when one of our aunts and uncles came to visit, and then again when more dear friends came out. Ugh. I can’t help but spread them around!! I must be stopped!!!
THESE, these Ham and Cheese Pretzel Bites are the next level of this little baking adventure and I can’t wait to try them!

1 1/2 cups warm water
2 tablespoons brown sugar
1 1/4 teaspoons active dry yeast
6 tablespoons melted butter
2 1/2 salt
4 1/2 cups flour
vegetable oil
3 quarts water
3/4 cup baking soda
1 whole egg, beaten with 1 tablespoon cold water
|
|
|
|
I did this a little backwards. I mixed the flour, salt, sugar and yeast and then added the water and the butter. Mix it with the dough hook on your mixer until it forms a ball of dough. Oil up the bowl and let it sit by the oven to rise, preheat your oven to 425F and watch your dough rise. Well, I’m sure you have better things to do than sit there and watch it, but when you come back, it’ll be bigger!
|
|
|
|
|
Divide the dough into a few smaller balls and roll into long strips.
|
|
|
|
Slice the rolls of dough into bit size pieces. Boil the water and add the baking soda. Plunk a few dough pieces in the boiling water at a time, then move them to a parchment paper lined cookie sheet. Brush each one with the egg and water mixture, sprinkle with salt and bake for about 15 minutes.
|
|
|
|
Caution: Only make these for a group – or when you have starving children around. DO NOT make these and assume you’ll have ‘just a few‘. Famous last words, my friends. They are way too addicting.
|
|
|
Mar 17, 2012
This is one of those recipes that’s hardly even a recipe really. You can make as much or as little as you want, depending on what you already have on hand. Don’t mistake though, even if you don’t have any of the ingredients on hand this little treat is worthy of a trip to the store. I have read Lasagna Wraps described as a quick fix to a lasagna craving. No. No, it’s not a quick fix. You still have to make your sauce, which is arguably the bulk of the work in making lasagna anyway, you still have to shred cheese and you still have to boil the noodles. Even if you use ‘quick’ noddles, you have to boil them when with lasagna of course you don’t have the boil the quick ones. So long story short, they’re good and smaller and cuter, but they’re pretty much the same amount of work – unless you have a pot of lasagna sauce kicking around. In which case, they will be pretty close to effortless.
Anyhoo, I pretty much gave you the recipe in the intro. Ha. You’re welcome!

*Measurements are non existent because it can be tailored to what you have / want without much thought
–your favorite lasagna sauce (hehe)
-lasagna noodles
-shredded cheese
|
|
|
|
I linked to my own lasagna sauce recipe because it’s tried and amazing. Next boil as many lasagna noodles as you want servings. Scoop about 2 tablespoons or so of the sauce onto the edge of a noodled laying flat on a cutting board (or whatever), top with cheese and roll.
|
|
|
|
|
I secured each one with a toothpick because really? You have to ask why? What a mess without them. I have 8 in this cute little brownie pan, I made these as part of a buffet for overnight guests and they were all gone.
|
|
|
|
|
On top I added a thin layer of sauce and a small handful of shredded cheese. You could really cover these little guys in both more sauce and more cheese, but then it’s almost like a lasagna and if you went to the trouble to make wee wraps, you may as well let them look like wraps. I cooked them at 350F for about 30 minutes. Everything is already cooked so you can get away with just popping them in to melt the cheese if you used quick noodles!
|
Mar 16, 2012
Sometimes, I get up stuuuuuuupid early and make a fancy breakfast for the wee ones (and my husband if he wants but he almost never has breakfast). There is never any guarantee the children will actually eat whatever I felt like cooking at the crack of dawn. We have learned that while waffles, muffins, and other various sweet breakfast treats get all three of them going, hollandaise doesn’t cut it. I tried this on them last year and they weren’t into it, so I also made some chocolate chip muffins muffins for the littlest ones and some bacon and cheddar biscuits for the oldest, juuust in case and sure enough, they weren’t having it.
Dude. I can’t eat 1 cup of butter and 4 egg yolks. Can I? No, I’m pretty sure my heart would like, stop right there in protest. It’s so good though it’s hard to have around. Either make it for a group or take it to your neighbor’s house ASAP.
As per instructions in the book, I clarified the butter before I started and it was the first time I had done it. I was so pleased with myself! It’s one of those magic things in the kitchen that you don’t see the magic in until you actually do it. So, as you probably know, butter is butterfat, milk solids and water. When you clarify butter, you’re removing the milk solids and the water, leaving just the butterfat. It sounds, well, amazing but not something my doctor would approve of! Generally clarified butter is great for sautéing with because it burns at a much higher temperature than actual butter, but because it’s also crazy rich and flavorful, it’s very good for dishes where the butter flavor takes center stage.

Hollandaise Sauce – via Cooks Book
2 tablespoons white wine vinegar
2 tablespoons water
1 teaspoon lightly crushed white peppers
4 egg yolks
1 cup unsalted butter
juice of 1/2 lemon
pinch of cayenne pepper
|
|
|
|
|
|
| Start melting the butter over medium-low heat. The white goo at the top is the milk solids separating. As the milk solids bubble up, skim them off with a spoon until you’re left with the pure butterfat. |
|
|
| First (not pictured) mix vinegar, water and peppercorns in a small pot and bring to a bowl. Lower heat and simmer for 1 minute (should be reduced to 2 1/2 tablespoons). Remove it from heat and set aside. Now bring a small pot of water to almost a boil and set a heat proof bowl over it, slip your yolks into it and whisk, whisk, whisk. Whisk your little heart out. |
|
|
|
|
|
|
| Now, with the egg yolks whisked into submission, remove from heat and whisk in the butter. Theeeen whisk in the cooled vinegar mixture and then the lemon and cayenne. |
|
|
|
| Now sneak a taste with a crust of bread. The French always say ‘a crust a bread’, like a soft piece of bread isn’t worthy or something. If your sauce starts to separate, it’s totally a visual thing it will still be amazing, but if you need to fix it (or as The Cook’s Book says ‘returned to respectability’) by slowly whisking in a fresh egg yolk. Pour over a gently fried egg on an English muffin or biscuit. |
|
|
|
Yummy grown up breakfast food on a weekday! No way!
|
|
|
| These were for Wee One #1 and the kids next door. I made a bunch of biscuits the night before and just topped them with bacon and shredded cheddar. Then I popped them back in the oven for about 15 minutes to melt the cheese. They totally cleaned the platter! |
Feb 16, 2012
I found this recipe over at Life as a Lofthouse forever ago and bookmarked it for ‘later’. This recipe was originally posted in September of 2010! I finally made this for my dear friend Brigitte, her brother Mike and her husband Hal when they came for a visit around Christmas. Brigitte was with me in the kitchen when I made it (hilariously typical) while the guys were, where else? In the garage (omg what a horrible poster group for stereotypes ha). Anyhoo, later when we served this, along with a few other tasty apps I’ll post about later this month, Hal totally thought the sauce came from a jar! Not like ‘this sauce is so bland I bet it’s from a jar’, more like ‘omg this sauce is so good, as if you made it yourself’. It’s always a super rad feeling to be able to whip up something that family and company loves, but to do it with such basic ingredients that we all have on hand? Super mega rad, my friends.
I also just noticed that Life as a Lofthouse has a Menu Monday!! I will link up with her next week!

Coating:
3-4 boneless chicken breasts
salt +& pepper
1 cup cornstarch
2 eggs, beaten
1/4 cup canola oil |
Sweet and Sour Sauce:
3/4 cup sugar
4 tablespoons ketchup
1/2 cup vinegar
1 tbs soy sauce
1 tsp garlic salt |
Preheat your oven to 325F, rinse the chicken in water and then cut into chunks. Season with salt and pepper (or not, your call).
|
|
|
|
Dip each piece into the cornstarch first.
|
|
|
|
|
Then dip into the eggs! Mix the sugar and the ketchup in a medium sized bowl.
|
|
|
|
|
Add vinegar, soy sauce and garlic salt. Mix, mix, mix!
|
|
|
|
|
Transfer the cooked chicken chunks to a baking dish and pour the sweet and sour sauce over it. Bake for about an hour and give it a stir once every 15 minutes or so.
|
Aug 26, 2011
This post title does not at all describe what I’ve added to the site today, just what’s keeping me from adding more. Whenever my amazing, wonderful yarn-spree-paying-for husband buys me heaps of yarn, all I want to do is knit it up. We have been buying from Knit Picks a lot lately, not just because their prices are very reasonable (though they really are) but because their shipping isn’t painful. Ordering the same types of yarn from other shops will run us twice as much! Now that the wee ones have three other wee ones next door to play with everyday, I plunk down on the patio and watch all six of them run and chase each other and throw their little heads back in laughter and make delicious memories. Wee One #2 is the only one to have a new playmate her exact age and man, do they get along well. Instant besties, it’s the sweetest thing. The oldest kids are just a year apart and have created a series of videos for their new You Tube channel. Yup, that’s what I said. My favorite is when the neighbor kids stay for supper and we fill both kid-sized picnic tables, it’s soooooo cute to have half a dozen kids running around. I know, I know, that’s crazy. Don’t worry, I will probably not be having another three kids. Probably. I am still the weird neighbor that brings baked goods next door almost everyday – except now my next door neighbor totally gets it and so far likes everything I’ve made for them. Score. Anyhoo….
We’ve also checked out the park and we’ve gone swimming at the dock a few times. I have to admit though that I miss walking for an afternoon swim in the lake by our old place. There were often pretty decent waves on the lake, which was fun for so many reasons and the sand bar was sweet too. However, being able to go for a swim whenever is rad – dock or lake. 🙂
I added two posts today, one in Crafty and one in Healthy, though as I have noted before I am aware that most of the recipes in that section should be dubbed healthier, and not necessarily healthy. Ahem. I’m getting through the backlog of things to post. I should be totally up to date in less than a month! I’ll be posting Halloweeny stuff on time! Hooray!
 |
These were silly and fun to make for the last day of school for Wee One #1’s class. He just finished grade 5, so it had to be something fun but not too cute. They’re one of those projects that’s done in 20 minutes and only requires a few supplies. These are literally Rolo sleeves wrapped in construction paper. |
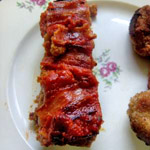 |
This is Jessica Seinfeld’s Deceptively Delicious version of Italian Meatloaf. It’s made with spiced breadcrumbs, lean ground turkey, carrot puree and turkey bacon (among other things). It was just meh but I think if I took out the extra liquid and just left the carrot puree it would hold together a lot better. Or maybe adding some ground oatmeal? We’ll see if I even re-do this one again. This book has had enough winners for me already as it is and this was the 13th recipe I made from it. |
I also remembered to take photos of the kitchen to show you, so I’ll get on some pictures of the pantry and talk about that tomorrow!