So Very Domestic started as a food and crafty blog and has grown to be so much more than that! It now documents the domestic bliss, Southern California adventures and homeschooling that is this life of ours in pretty pictures with recipes and tutorials and reviews. Thanks for reading!
Right now I am knitting...
Maytina has
read 7 books toward her goal of 52 books.
I Adore These Blogs!
1) read 52 books (8/52)
2) sew a dress for myself
3) send everyone a card for their birthday
4) make candles
5) hand write and mail (at least) 52 letters (14 so far)
6) knit this quilt (258/400 puffs)
7) knit 12 pairs of socks (2/12)
8 ) bake one new cookie recipe every week - and blog about it (4/52)
9) make a small quilt
10) start a 'What I did today' daily journal project (using The Happiness Project )
11) participate in Craftster's Monthly Challenge
12) go on at least one epic road trip and as many smaller ones as possible
13) knit 13 Tiny Owl Knits projects
|

Jan 4, 2013
Today, I’m linking up with Petals to Picots, Sippy Cup Chronicles, Happy Go Lucky, and Chubby Cheeks Thinks.
I had seen a few different tutorials online for magnetic bookmarks, first over at Flipflops & Applesauce and then on Split Coast Stampers but ultimately, it was the beauties from The Southern Institute that inspired me enough to actually do it. Louise from I’m Feelin’ Crafty made an excellent tutorial for The Southern Institute that I deviated from a bit to make my own. I still struggle with my sewing, and it’s no one’s fault but my own – I just need to do it more so I can get better! They came out pretty cute though, I really like them. I will try again after more practice and we’ll see how they look then!
These were super fun to make and a great way to use up pretty and cute scraps. I know pretty much everyone reads on some kind of eReader, but I also know that pretty much every reader has a weakness for the handful of actual books they still have kicking around. A lot of my friends, plus my sister and my dad, have a serious love for used book stores. We also all have a serious love for the library. So these bookmarks were a practical project for us and I hope they are used in place of random subway transfers and bits of paper.

-scrap fabric
-little magnets
-scissors
-thread
|
|
|
|
|
First I ironed down the edges of a 2″ x 6″ piece of fabric and hemmed all around.
|
|
|
|
|
Then I folded and ironed in half, and sewed that side down.
|
|
|
|
|
Next I placed a magnet circle (attracting ends up!!) on each edge, folded the fabric over and sewed it in place.
|
|
|
|
|
That’s it!! Then I tried it out in a couple recipe books and did it all over again five more times!
|
|
|

Mar 13, 2012
I’m linking up with The Tuesday Glam Party, One Project at a Time, Take a Look Tuesday, Tuesday’s Treasures, Ta-Da Tuesday, Tuesday Time Out and Tuesday Tutorial Link Party. Check out some of the amazing projects in these link ups!
I am always looking for sewing practice, and as I’ve mentioned before and will mention again, I’m not amazing with a sewing machine. I mean, I earn the domestic in my title with my oven and my knitting needles, but yeah, sewing is something I’m still figuring out. So, I try to do it as much as possible and hopefully sometimes the things I practice with are wearable or usable! In this case, it is!
Prudent Baby has a serious archive of quick and useful crafty projects and I love to comb though it for ideas, inspiration and a lot of the time, instructions!

Drawstring Toddler Pants via Prudent Baby
Pair of elastic or drawstring pants that fit your wee one
2+ yards of cute fabric (how much depends on the size of your wee one)
Grommets
Drawstring
Pins, sewing machine, stuff like that…
|
|
|
|
First, fold the pair of pants that fit your wee one in half and lay them over the fabric. Trace around, adding about 1/2″ for the seam all the way around. Now do it again. Lay them right side facing and pin together.
|
|
|
|
|
Sew the curves first, down the sides and hem the bottoms.
|
|
|
|
|
This is the part that gave me trouble, I had to keep checking and double checking that I wasn’t about to sew the front of the pants to the butt, you know? I did it! If I can do it, you can defo do this.
|
|
|
|
Tah-daaaaah!!!
|
|
|
|
|
Now for the grommets! You can make an actual drawstring waist or a fake faux drawstring like I did. Snip a wee hole to pop one side of the grommet through.
|
|
|
|
|
Then punch the other side through with a hammer. So neat!
|
|
|
|
This is when I slipped in the elastic and sewed up the waistband, just shy of the grommets.
|
|
|
|
|
I cut two shortish lengths of nylon cord and knotted one end of each. I pushed them through the grommets and knotted them again. Then I finished off the waistband and I was done!! When I note in the sidebar that I’m struggling with sewing, that’s no exaggeration. I’ve never been very good at it even though in my head (and only in my head) I’m a brilliant seamstress. So this was great news for the future brilliant seamstress I will become. Ha!
|
|
|
|
|
|
|
|
|
|
|
|
|
|
|
|
|
I think my eager little model likes them! This is Wee One #3 with her creepy Joker smile.
|

Mar 12, 2012
This week, I’m linking up with Polly Want a Crafter, Motivate Me Monday, Made By You Monday, Make It Monday, More the Merrier Monday, Masterpiece Monday, Craftomaniac Monday, Make It Monday, Metamorphosis Monday, Making the World Cuter, Make It Yourself Monday, and Bedazzle Me Monday! Check out the projects in these links, so creative and so fun!
This is one of those projects that’s only hard in your head, once you actually get started on it you’ll find it’s no biggie and comes together really, really quickly. As long as you can sew, even a little, you’re good to go!
I made this for Wee One #2, but the same instructions apply for an adult, just bigger! She love, love, loves to dress up and run around and cause a lovely disaster in her cutest dresses. Making an inexpensive but adorable tutu for less than $10 makes a lot more sense than dropping $40 on one – especially if your wee one runs into the backyard and rolls around in the grass and/or dirt while playing princess and pirates!

Tutu via Prudent Baby
4 yards of tulle
matching thread
safety pin (I ended up using a hair clip!)
2ft elastic (to fit around your wee one’s waist)
sewing machine duh
scissors double duh
|
|
|
|
First, fold your fabric in half, widthwise so you have a wiiiiiide strip of tulle that is as long as you want the skirt to be. Now sew a small loop in the very top of all the layers to make a waistband. Then attach your elastic to a safety pin and feed the elastic through to the end. DO NO use a hair clip like I did. It was a bit of a nightmare.
|
|
|
|
Make sure you sew the end in place once you have fed the elastic into the waistband.
|
|
|
|
|
Keep feeding the elastic through to the end, it’ll be a little harder to work with the further through all the fabric you get. The wider your piece of tulle, the puffier the skirt will be. Puffier is always better when it comers to tutus. When you reach the other end, sew the elastic in place and then sew up the two ends to officially make it a skirt!
|
|
|
|
Next time, I’d use about twice as much tulle to make it even puffier!
|

Feb 28, 2012
My husband’s grandmother has always been super nice to me, and has always been helpful when it came to teaching me something new that I really wanted to learn. This past Christmas, she came to my rescue when I brought a kit for a homemade guitar strap that I had bought from Jen Stephens on Etsy along with a bag of skully fabric I bought specifically for the project and a really muddled look on my face. I had tried to make it happen on my own – I really wanted to make it happen on my own but I just couldn’t do it. The directions weren’t the problem I don’t think, it was my reading of them. Once Nanny took control of the situation, the project moved along pretty quickly and about half an hour later, we had a really snazzy guitar strap for one of our dear cousins on my husband’s side. I hope he loved it as much as I loved making it – I may even be able to make one myself next time!!

|
|
|
|
The cutting and the pinning were for sure the easiest parts. The directions were really clear and it came together no problem.
|
|
|
|
Sewing the fabric to the webbing was also not an issue, thankfully.
|
|
|
|
This is where I started to get a little confused, when it was time to sew the leather to the strap.
|
|
|
|
|
With Nanny’s help though this worked out with just two tries!
|
|
|
|
Voila!! Totally adjustable guitar strap!! It’s a really cool project because you could make it form Hello Kitty or Spiderman fabric depending on who you’re making it for!
|

Aug 21, 2011
Another catch up post today – and today I posted about homemade makeup again! Yup. Homemade lipgloss this time. First though, I’m trying to update each section with one article a night till I’m caught up and then I can blar, blar, blar on and on about whatever it is I’m obsessing over.
 |
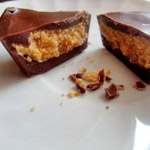
Homemade peanut butter cups are honestly better than store bought ones. The chocolate has a better crunch to it and there is just something satisfying about knowing what’s in your treats – even if it happens to include 2 cups of icing sugar! At least there’s no mystery chemicals that no one can pronounce, right? The wee ones love them, adults love them and if you pick up the molds, they even look pretty close to the real deal. |
 |
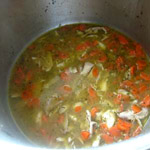
When I made this soup, I was perfectly healthy. Then just a few days after I made it, I had a horribly sore throat and lost my voice for a week! What?! Who let that happen?! It was awful, but this soup was a great comfort and of course I believe all that garlic and heat made me feel better – even if no one appreciated my awful garlic breath! |
 |
I know making a jean skirt from an old pair of jeans is nothing new, but it’s not difficult even with just the most basic sewing skills. Most of the effort in this project is in the ripping out of the old seam, which is usually at least double stitched. The result is a cute skirt that you can be sure will fit! |
 |
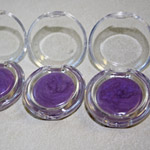
Yesterday I talked about making homemade mineral eyeshadows – today I’m onto homemade lipglosses! The glosses take longer to make but you can churn out more at a time and they are just as customizable. I made hot pink and then purple and also a batch of clear for Wee Ones #2 and #3. |
I have the great fortune of a new friend, who just happens to be a professional chef (how lucky am I?!), lend me one of his serious, grown up professional cook books. You all know by now how much I love to do silly, playful things in the kitchen. I mean, who doesn’t love it when I stuff a brownie into a cookie? Or when I bake pies into cakes? (I did that just last month and it’ll be a nice epic blog post when I get to it). But there is just something about putting on my apron, kicking the kids out of the kitchen and really setting to stretch my skills and make something as pro as I possibly can.
My new kitchen is pretty amazing for this sort of thing. Maybe tomorrow I’ll give a walk through after I do my catch up post for the day. So last night, with the assistance of this book, I made the best beef stew I’ve ever made. I know, I know, oh Maytina made a stew woooooow, but even my husband, who usually says after supper ‘thanks so much for making supper, it was really good’, turned to me after a few bites and said ‘wow Maytina, this stew is really good’ and then a few bites later he turns to Wee One #1 and says ‘isn’t this even better than usual?’ and then when the was wiping up the remains of the stew with his bread he said ‘seriously, burn this recipe into your brain, can it be the new way you always make stew?’ Maybe I will skip ahead and post this recipe soon.
Also this week, the Beekeeper’s Quilt was introduced to me. Holy moly. I absolutely must make this. I still feel that way about the sock yarn blanket (my sister Nikoleta made this one). There are only so many hours in a day unfortunately, so this amazing quilt will have to wait a while. But I can dream.
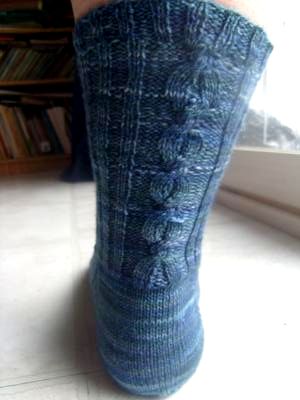
I’m just starting the foot on my first Cobblestone sock in Knit Picks Stroll in Sprinkle Heather. I made a pair last year for my mother in law too. They knit up quick but I’m itching to get to my queue. I can’t ever have more than one thing on the needles at a time, unless the sock blanket is one of them because I’ll knit up my leftover sock yarn after each pair of socks before I move on to something else. My list-oriented-ness is alarming even to me sometimes. Ha!
So fun to be posting again!

Jan 12, 2011
In this post, I’m participating in three WIP Wednesdays; Freshly Pieced, Tami’s Amis and Musings from the Fishbowl.
I have something that isn’t being knitted this week!! Do you need a moment?
It’s hard to believe that I haven’t knitted at all this week, but I have been sewing! So far, I’ve stuck to very small items, like baby dresses and bags. Technically, curtains should be incredibly easy after making cute little baby dresses that actually fit and were totally wearable. So I figured instead of potentially ruining new fabric, I did just what I did with the baby dresses – I used sheets!
Hilariously, even after measuring the window, I cut my panels too short. Of course. They cover the window…mostly. Also, it really looks like I used the wrong stitch for my hems too, doesn’t it? Like it was too tight because it almost looks like it’s puckering. I think. I dunno, but it looks ‘weird’. I definitely need a do over, but after having made that mistake with practice sheets, next time I’ll do them properly, with more fabric.

These curtains are as plain as humanly possible – to try to minimize the mishaps lol! I made a little folded over sleeve from the wide hem at the top of the sheet, then I hemmed the edges. They’re a WIP, not a FO because (if I was going to keep them, but I’m not) they’d need a backing before they could be officially finished and some kind of trim would be nice. However, I’m not keeping them so they’ll serve their purpose while I find more fabric and and try again.

I also ordered some fabric from Fabric Closet for Wee One #1′s bedroom. No pink princesses here. I know I ordered enough and hopefully this time, I wont find a different way to muck it up.


Jan 1, 2011
|