Browsing the blog archives for October, 2012.

Sturdy Cut Out Cookies – Ghosts & Tombstones

Domestic, Kids

Happy Halloween!!!

There is so much going on today for us that I have no idea where to begin. We ended up spending most of the day on Monday dealing with long distance house selling issues. Please note, however stressful irritating maddening ahem troublesome you think selling a house may be, imagine for a moment that you are about 2600 miles away from it and all cleaning, packing, moving and signing of official documents will be done long distance. Yeah, so that was Monday.

Yesterday was a fun meeting with Wee One #2’s teacher, I really like homeschooling this way. Support from the teacher, freedom to accomplish it our own way and most important the time we all get to have together! Amazing, really. So instead of Twinkle Twinkle’s Halloween party on Monday, we are going this afternoon and the kids are really, really hyped for it. I’m not going to lie, I’m super hyped for it too. It’s my favorite place to take the kids for some fun (and too many Caffe Americanos for mommy).

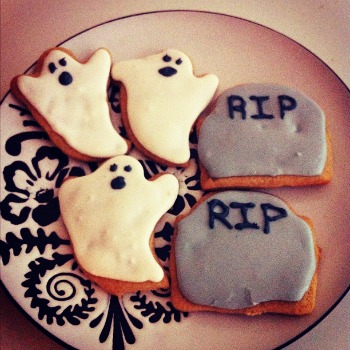
Today, we attack a stack of cookies and turn the kitchen upside down. It seems the best days around here end in a destroyed kitchen that I then spend a good hour after they’re done cleaning – but it’s totally, undoubtedly, absolutely worth it. <3 This recipe is from a book of activities to do with preschoolers, so you know this cookie is sturdy! They are not horribly chewy, which would be a really weird texture for a cut out cookie, but they are not so tough they're really crunchy either - just perfect. Especially perfect for handing over half the batch to an eager 3 year old and 6 year old with royal icing covered aprons, an arsenal of sprinkles and a whole lot of imagination. They didn't break a single cookie! This is officially my new go-to recipe for cut outs. The only thing to note about them really is that they are not as white as a traditional sugar cookie and the cinnamon and ginger give them a spice cookie taste without being overwhelming. Sturdy Cut Out Cookies - Ghosts & Tombstones

Sturdy Cut Out Cookies – via The Preschooler’s Busy Book

2 1/2 cups flour
1 teaspoon cinnamon
1/2 teaspoon ginger
1/2 teaspoon baking powder
1/4 teaspoon baking soda
1/4 teaspoon salt
3/4 cup butter
1/2 cup liquid honey
1/3 cup sugar
1 egg

Sturdy Cut Out Cookies - Ghosts & Tombstones
Super super simple, just mix all the dry, then the wet and then the two together! I found they rolled out and baked best when I followed this method: Divide the dough into four balls and roll each one between two sheets of parchment and pop in the freezer for as long as it takes to roll the rest out between their own sheets of parchment. Then take out the first one you put in and cut out the shapes, pop it back in the freezer and repeat that until all four balls are rolled out and cut into shapes. Follow the same process for lifting the shapes onto a baking sheet lined in parchment and rolling and cutting new shapes. Bake at 375 for about 7 minnutes.
Sturdy Cut Out Cookies - Ghosts & Tombstones
The beauty of these is you can cut out whatever shapes you want (or whatever shapes your kids want) and then decorate them in any way you (or more likely your kids) choose – or even better, both! Win-win! I chose ghosts, Wee One #2 chose tombstones (the other two were totally uninterested in what shapes we used). I made my standard Royal Icing (2 large egg whites, 3 cups icing sugar and 1 teaspoon lemon juice). I tinted a little bit black, a whole lot gray and left the rest of it white.
1 Comment

Halloweeny Greetings

Crafty, Kids

These cards were a fun afternoon with the kids, a way to show our far flung family and friends some Halloweeny love. I mean of course we try to send postal love as much as we can anyway, but festive love is the best kind of love, oui? Le duh is the appropriate response.

Halloweeny Greetings

-card stock
-heap tons of Halloweeny scrapbooking paper
-Halloweeny cookie cutters
-Halloweeny stickers
-construction paper
-silly festive jokes
-glue sticks
-loads more construction paper to make envelopes
-tape (to seal the envelopes)

*I also used a ‘just for you’ stamp that I fell in love with at Michaels and want to stamp on everything I make

Halloweeny Greetings
First, I cut each 8 x 10 piece of thick card stock in half and then folded it in half (using my Knit Picks guage ruler doodle but you could use a bone folder if you want to be proper about it). Then I stamped the back of each card with my cute stamp and started tracing the cookie cutters over scrapbooking paper.
Halloweeny Greetings
I put an unreasonable amount of thought into which shapes should be cut from which paper. Totally unreasonable, I especially love the ghosts with the green chevron and the eyes. The eyes and mouth of the ghosts came straight from my hole puncher – that’s some really effective recycling right there.
Halloweeny Greetings
I also stuck a Halloweeny sticker in the corner of each card – and cut out a zillion more ghosts and pumpkins. With the pumpkins, I also cut out Jack o’lantern faces and glued them on. Then I added one of 5 silly jokes inside each card and a cute note to our folks, our aunts and uncles and our long distance friends and then we all signed them. Well, I signed for Wee One #3, but otherwise, we all signed them. Theeen I took apart a cute envelope that fit the cards and made a stack of envelopes, addressed all the envelopes, taped them shut and away they went! Hopefully everyone adores receiving them as much as we loved sending them.
Halloweeny Greetings
1 Comment

Menu Monday

Domestic, Homeschooling

Usually when our schedules are overflowing, it’s full of crazy fun stuff that I planned. So when I’m crazy busy, it’s generally because I want to be. This week however, not so much.

I mean, I WANT our house in Canada to close but I don’t love that I have to run out to a notary today to do the paperwork. I am super hyped for a Halloween party at Twinkle Twinkle this afternoon (hands down my favorite place to take the kids), but making sure I balance out the day with school between (and after) the notarizing and the party isn’t exactly laid back.

Tuesday is the second week we are meeting with Wee One #2’s teacher (we are still homeschooling but now we are doing it through a local school) and I’m happy to check in with her and get some feedback and show off what we did last week, but I’m not looking forward to also taking all the kids with me to the YMCA to sign up for memberships – even though I am looking forward to using those memberships!

Wednesday is Halloween of course, so after we do a day of school we’re having a Halloween party! I have a handful of games planned for the kids and some silly activities to get them in the mood for trick or treating. We’ll have a busy BUT crazy super fun day.

Thursday is the second week we are meeting with Wee One #1’s teacher (homeschooling through the same local school as Wee One #2), we’ll likely use this day as a catch up for whatever we didn’t manage to accomplish with school and around the apartment.

By Friday, life should be a little calmer.

Since none of this has anything to do with dinner, I made a menu for this week as I normally would.

This Week’s Menu (Mon Oct 29 – Sun Nov 4)

Monday – Mini Shepard’s Pies with Corn, Gravy and Garlic Cheddar Biscuits and Trix Treats for dessert

Tuesday – Sweet & Sour Chicken with Cheese & Bacon Potato Rounds and Cauliflower Tots and Oreo Brownies for dessert

Wednesday – ‘Forgotten’ Pork Chops with Hush Puppies and Corn on the Cob and Polka Dot Halloween Cake for dessert

Thursday – ‘Man Pleasing Chicken’ with Chipotle Rice and Candied Carrots and Chocolate Swirl Biscuits for dessert

Friday – Wendy’s Style Chili with Bacon Cornbread and Garden Salad (or small Ceasers, we’ll see) and Nutmeg Donuts for dessert

Saturday – Honey Garlic Pork Chops, Smashed Potatoes & Cheesy Broccoli Gratin and Triple Chocolate Chunk Muffins for dessert.

Sunday – Bacon Wrapped Herb-Stuffed Chicken with Chicken Stuffing and Creamed Corn and Strawberry Cake for dessert

I’m going to photograph every recipe I make this week and then maybe blog about them all next week!

No Comments

This Week (aka Happy Sunday)

California, Crafty, Domestic, Kids, Pretty

So so so much is going on this week and so much fun happened last week! I made a lot of Halloweeny treats in the last couple of weeks and they were all hits with the kids! Wee One #1 is dressing as a warrior skeleton type guy (he’s been picking pretty much the same costume every year in a bigger size for 3 or 4 years now), Wee One #2 is going as Hello Kitty and out littlest is going as ‘The Tooth Fairy’, she is very specific about what kind of fairy she is exactly. Much running around Los Angeles in costumes!

Sparkly gold shoes, ridiculous wedges with an equally ridiculous bow, a really cute necklace and dress combo and some Halloweeny cocktails rounded out my week. We made normal screwdrivers but we used black vodka and then we made Bloodtinis, which were just as delish without any booze in them at all. I really just wanted an excuse to use the shaker. 😉

Oh, and my piggie spatula, which is probably my most prized kitchen possession at the moment. You love it right? Of course you do!

Back in the morning with Menu Monday!!

1 Comment

Chocolate Peanut Butter Cupcakes

Domestic

These cupcakes were one of four different kinds I made for the second birthday we celebrated after our move to LA. The first one involved the much loved (and totally insane) Chocolate Kit Kat Skittles Cake. This birthday boy is not into candy so much as overall decadence, so a tray of snazzy cupcakes was my obvious choice. 🙂

These cupcakes were one of my favorites because I really, really love the combination of chocolate and peanut butter. It’s such a shame that the mass produced partnerships of chocolate and peanut butter taste so fake. Anyhoo, these cupcakes do involve two batters, however the extra work of mixing a second batter is totally negated by not having to frost them when they’re done. The way the two batters bake into each other and of course the peanut butter chips and chocolate chips on top is more than enough of a replacement for frosting!

The grow ups loved these as well, but they were a really big hit with the kids!

Chocolate Peanut Butter Cupcakes

Chocolate Peanut Butter Cupcakes via Pillsbury

1 1/2 cup all purpose flour
1/3 cup cocoa
1 cup packed brown sugar
1 teaspoon baking soda
1/4 teaspoon salt
1/3 cup vegetable oil
1 cup water
1 tablespoon white vinegar
1/2 teaspoon vanilla
1 egg
1 8oz package cream cheese, softened
3/4 cup creamy peanut butter
1/3 cup sugar
1/3 cup confectioner’s sugar
1/4 cup peanut butter chips
1/4 cup semi-sweet chocolate chips
Chocolate Peanut Butter Cupcakes
Preheat to 350 and pop liners in your muffin cups. 🙂 Whisk together the flour, cocoa, brown sugar baking soda and salt. Once that’s all incorporated, add the oil, water, vinegar and vanilla – do NOT overmix!
Chocolate Peanut Butter Cupcakes
In a new bowl, mix the egg, cream cheese, peanut butter and sugar (much easier with an electric mixer) until smooth, then add the confectioner’s sugar.
Chocolate Peanut Butter Cupcakes
This is the fun part! Spoon 1 tablespoon of the chocolate batter into each muffin cup, then 1 tablespoon of the peanut butter batter, then a second tablespoon of chocolate batter and a second tablespoon of peanut butter batter.
Chocolate Peanut Butter Cupcakes
Sprinkle with peanut butter chips and chocolate chips!
Chocolate Peanut Butter Cupcakes
Bake for 25 minutes or so and let cool 15 minutes before you try to pry them out! The original recipe says to wait another 15 minutes before you serve them but I made these for our friend’s birthday so we didn’t get to them until way later that night (and they were amazing).
Chocolate Peanut Butter Cupcakes
Behold! The rest of the birthday cupcake tray!
Chocolate Peanut Butter Cupcakes
3 Comments

Chocolate Cocoa Crinkles

Domestic

These are among my family’s top 10 favorite Christmas cookies, which is a list that will be rundown at some point next month and even though I’m up to my neck in festive Halloweeny fun right now, these were just begging to be made and posted about! Sometimes, you just have to veer off track and bake a batch of Christmas cookies in the middle of October surrounded with orange and black construction paper and pumpkin seeds. Amiright?! No? That’s just us?

These cookies are good whenever, honest. They are slightly crunchy on the outside (hence the ‘crinkle’) but they are soft and chocolaty on the inside. They are hella addictive though so be sure to share!

Chocolate Cocoa Crinkles

Chocolate Cocoa Crinkles – via Betty Crocker’s Best Christmas Cookbook

2 cups sugar
3/4 cup vegetable oil
3/4 cup cocoa
4 eggs
2 teaspoons vanilla extract
2 1/3 cups all purpose flour
2 teaspoons baking powder
1/2 teaspoon salt
powdered sugar (for rolling)

Chocolate Cocoa Crinkles
So first up, mix the sugar and oil and then add in the cocoa until totally combined. Now add the eggs, and vanilla. Sift the flour, baking soda and salt and then stir that into the cocoa mixture. Now pop it in the fridge for a few hours.
Chocolate Cocoa Crinkles
Once the dough is solid enough to form into balls, do just that! Make them each with about a tablespoon of dough. Of course you can make them much smaller or bigger depending on what you are making them for and how you want to package them, but you’ll have to adjust the baking time.
Chocolate Cocoa Crinkles
Now, whatever size your balls are, roll them in the powdered sugar and place them about 1″ apart (the bigger the balls the more space you need hehe) on a parchment paper lined baking sheet. Smoosh them down with the bottom of a glass before you bake them – for 11-13 minutes at 350 (more or less of course if they are smaller or bigger than a tablespoon each). I am making these for the base of a Halloween cookie so I’ll have festive versions of these babies up soon!
No Comments

Menu Monday with Throwback Burritos

Domestic

I’ll quickly rhyme off this week’s menu so we can get onto the burritos!

This Week! (Oct 15 – 21)

Monday – Chicken Alfredo with Rosemary Buns for the fam, Vegan Falafels with Rice for me

Tuesday – Spaghetti with Meatballs and Garlic Bread for the fam, Tofu Stir Fry for me

Wednesday – Pork Chops with Mashed Potatoes and Corn on the Cob for the fam, Crack Wrap and Corn on the Cob for me

Thursday – Breaded Chicken with Cheesy Noodles and Green Beans for the fam, Vegan Falafels with Rice for me

Friday – Beef Stroganoff with Parmesan Breadsticks for the fam, Pumpkin Oatmeal Bake for me

Saturday – Out celebrating my birthday! 😀

Sunday – Roasted Chicken with Root Veggies and Pull Apart Garlic Bread for the fam, Vegan Nachos for me

*I didn’t list desserts because I’m making Halloweeny treats I will be blogging about later

This week’s Menu Monday recipe is called Throwback Burritos because until I made them for these photographs I hadn’t had one in about 13 years. Yes really, and it’s not that I’m all that old really. These were the burritos I lived on with my now husband/then boyfriend and our hilarious roommate Ken. The background on that is that my husband and his roommate go waaaay back, and then I moved in as well years after the fact. No one but Ken ever made these either! I was always strictly on cheese grating duty while he worked his magic in the kitchen.

Now that we are living in Los Angeles, my husband and I have a horrible addiction to Chipotle and while eating a massive Chipotle burrito recently my husband reminisced about all the burritos we used to eat back in the day so I fired off a Facebook message to Ken and we were eating this throwback dinner a few days later.

Most of the instructions here I am pulling straight from the message I got from Ken because his descriptions are pretty bang on, especially when he opened with ‘those burritos were dirt simple’, and I’m all ‘is that why you kept us out of the kitchen?!’ hahaha.

Throwback Burritos

Throwback Burritos via Ken Snider

-large tortillas
-taco seasoning
Sirarcha/rooster sauce
-minced garlic (though back in the day we used garlic powder)
-some sort of salsa or pico de gallo
-ground beef at least lean/medium (high fat content is needed here to get the smooth texture, if you use extra lean it’ll taste grainy)
-Uncle Ben’s long grain & wild with roasted garlic flavor (you can make this yourself in a rice cooker with some chicken broth and garlic, but if you want the taste you remember you want Uncle Ben’s)
-*fucktons of cheese* (I believe that’s an accurate measurement of the specific amount of cheese needed)

Throwback Burritos
Throwback Burritos
Ok, so first brown ground beef, drain. Add taco seasoning and water (one cup water per packet per pound of ground beef) and simmer until thicken (it won’t thicken much, might want to add some cornstarch or flour, not much, maybe a teaspoon, to allow it to thicken). Now add Sirarcha and garlic to taste. Prep rice and prepare. If you use the uncle bens stuff, it takes two mins in the microwave, which is awesome. (Except I still don’t have a microwave haha).
Throwback Burritos
Throwback Burritos
Add rice to meat mixture and stir. Remove from heat, place in a heat-resistant bowl and refrigerate, for a minimum of one hour. THIS STEP IS CRUCIAL. It’s what allows the fats from the meat and cheese to commingle and congeal into burrito deliciousness. Be patient. Wait. It’s worth it. (Obvy, Ken is a wise, wise man). Then grate your fucktons of cheese and set aside. I put them side by side in the fridge in similar container and cover them.
Throwback Burritos
Throwback Burritos
I usually layered cheese (as a stabilizing agent), then some of the mixture, then cheese, some of the pico de gallo, some more mixture, fold and top with more cheese, and more hot sauce if needed. Nuke for 3-5 minutes and you’re done! (The first time I folded one of these – well the first time this time around – I did it perfectly and crazy fast and my husband goes ‘omg what was what?’ and I was all ‘it came from the back of my brain!’).
Throwback Burritos
Mine were heated in the oven this time around, but I swear, they taste like 1999. <3
No Comments

Work in Progress Wednesday #17

Crafty

Today I am linking up with Freshly Pieced

I can hardly believe it, but Sockdown 6 has totally lit a fire under me for finishing socks within a respectable time frame!

I cast on for this pair on October 3 and I am about 10 minutes from finished – and that’s with two days of not knitting because I was doing homeschool prep one night and Halloweeny stuff with the kids the other night. Which means I managed a pair of socks in 5 days! What?! I’m going to cast on for another pair tonight! Officially that’s two pairs of socks in September and so far one in October.

The pattern is called Summer Lovin and I used Knit Picks’ Felici Fingering Self Striping Sock Yarn in ‘Mixed Berries’. I made them as a birthday gift for one of the kids’ godmothers (which totally gives it away since only one has an autumn birthday and her favorite color is purple, however she almost never reads my blog anyway 😛). Anyhoo….these will be finished up today and popped in the mail this week!

summer lovin socks

These are the beauties I finished up last week, the pattern is called Maidenhair Fern and it was a fun knit. I am totally in love with this yarn, Nova Sock that I picked up in the woods before we moved. It’s pretty and soft without being so soft it slips off the needles. My only issue with this yarn, and yes it is an issue, is that the colors are always just numbers. Pfft. Part of the love of yarn are skeins with names like Whitewater or Black Purl or Greenling, and even names that don’t sound like colors at all like Juice Box and Tree Fort and Hayride. Not numbers. Ugh.

These little beauties are going in the mail today as a treat for an unsuspecting friend – an unsuspecting friend that reads my blog! Just you wait! Haha. 🙂

Maidenhair Fern socks

Maidenhair Fern socks
2 Comments

Halloween Countdown Calendar

Crafty

Today, I’m linking up with Sugar Bee Crafts, A Bowl Full of Lemons, My Uncommon Slice of Suburbia, Today’s Creative Blog, Tip Junkie, Our Thrifty Ideas and Cherished Bliss

This is easily one of my favorite projects I’ve made. I adore Halloween and I adore countdown calendars so pairing the two makes me happier than it probably should. The original inspiration for this project came from Make it, Give it. I followed the basic guidelines but since, you know, I’m me, I had to make them a little more. Haha. I love how they turned out and I made a little tutorial in case you want to make one too.

Halloween Countdown Calendar

You will need:
-glue gun and refills
-magnet dots
-orange and black construction paper
-wooden pieces (something to act as a backing for each piece)
-a small baking sheet
-Halloweeny paper
-eleventy billion trinkety things (or you know, 31)
-scissors, ruler, white colored pencil, black marker, orange or white crayon

Halloween Countdown Calendar
First decorate the cookie sheet however you see fit. You could paint the whole thing black and then add stickers and other embellishments. I glued some cute Martha Halloweeny paper to my cookie sheet, and a rectangle of black construction paper to act as my calendar background. You can’t see but I didn’t stack the papers behind it, they are arranged in a frame around it with the construction paper overlapping just a little. Otherwise, there would likely be a magnet issue!

You’ll notice there are only 30 squares on my calendar, I did that to make #31 a bigger piece under them all but you can make your calendar however many days you like. If you only want to count down two weeks before, make it just 14 squares.

Halloween Countdown Calendar
Then I went through some of the trinkety things I picked up and decided where I wanted to use some of them and I cut down a few bamboo coasters to be the backings for my pieces.
Halloween Countdown Calendar
Next I glued orange construction paper to every other piece and black to the leftover pieces.
Halloween Countdown Calendar
This is where it really gets fun! The only guidelines here are that each piece needs some kind of embellishment, a number and a magnet dot on the back. The details are up to you. My first two were a sparkly bat sticker and a skull from a seriously ugly bracelet. I used plain stickers, raised stickers, and beads. The purple bat was cut off the front of a plastic ring and the key is from a Martha scrapbooking set.
Halloween Countdown Calendar
Once I had finished making pieces for each day, I embellished the cookie sheet itself a bit more. I added a witch broom to one corner and a big ugly spider to another. I also added magnets to some squares on the calendar that had especially heavy pieces to make sure they wouldn’t fall off.
Halloween Countdown Calendar
I have seen some versions of this with holes drilled in the cookie sheet to allow a ribbon to be weaved through for it to hang from. I had to recharge my Dremel and decided to try out the 3M Command Hooks I just picked up and they worked really well! Two hooks on the back of the cookie sheet and one hook on the wall.
Halloween Countdown Calendar
The kids are taking turns putting one up each day, and all of the magnets are stored on the back! Happy Halloween!!
No Comments

Homemade Facial Cleansers

Healthy, Pretty

Last year I started experimenting with making my own mineral makeup, lip glosses and bath fizzies and a few months ago we made soap with new friends! Since all of these experiments went so well and I was not only able to use everything I made, but it all turned out really nice and in some cases even better than I expected, I started experimenting with face masks! There are a zillion recipes online for masks and cleansers and potions, but some of them have either hard to find ingredients or unnecessarily expensive ingredients. So after wading through about 100 recipes, I read up on the most common ingredients and what properties they have that are so good for skin and of course I tried out a bunch of these myself!

Watermelon
Watermelon is one of the ingredients that comes up again and again in facial mask recipes. Mostly because just like when you eat it, applying it to your face really hydrates your skin, regardless of whatever else you add to it, so when you add it to anything else that hydrates on contact (like cucumbers) you can quickly and safely moisturize a dry face. Win! The Watermelon and cucumber combo also has skin lightening and soothing properties, so the next time you’re nursing a sunburn, mash half a cup each of watermelon pulp and cucumber and spread over where ever you are red!

So, why? Well, I mentioned that watermelon pulp hydrates your skin like crazy and it’s also an amazing anti-inflammatory. It’s also full of vitamins C, A, potassium, and magnesium, which I generally only think of in terms of eating it but there’s a lot of research swirling around that since your skin is your biggest organ you’re absorbing (and therefore ingesting) whatever you use topically.

Watermelon Yogurt Mask
1 teaspoon watermelon juice
1 teaspoon plain Greek yogurt

Yogurt & Oatmeal
There are a lot of yogurt based masks out there. After reading about all of yogurt’s superpowers for skin, I get why. It it chock full of lactic acid, which apparently is beyond department store creams in refining pores, scrubbing out the dead skin cells and get this, stimulating collagen production. Any bottle that says that in a spa will instantly be twice as expensive as anything around it, so getting that for next to nothing from yogurt? Sign me up!

Another reason yogurt seems to dominate the recipes for DIY facial masks is it’s consistency is perfect for making a paste out of so many other ingredients that are good for your skin (like oatmeal and honey).

Oatmeal is extremely beneficial to your skin and since we have already covered what yogurt can do, I’d happily rate yogurt/oatmeal combos as serious winners! Apparently, humans have been using oatmeal on their skin since 2000 BC (don’t ask me how ‘they’ know that, but they do)! Oatmeal contains polysaccharides and these little babies get all gooey in the water and leave a (good) film on your skin that protects against flaking! It does a good job of moisturizing as well since oats are full of good fats, and natural cleansers that pull out dirt and oil from pores!

Yogurt & Oatmeal Moisturizing Mask
2 tablespoons plain (full fat) yogurt
1 tablespoon honey
1-2 tablespoons cooked & cooled oatmeal
Yogurt & Honey Cleansing Scrub
1 tablespoon honey
1 teaspoon plain yogurt
2 tablespoons finely ground almonds
1/2 teaspoon lemon juice
Calming Mask
1/2 cup of plain yogurt
2 tablespoons Aloe Vera gel or juice
1 tablespoon honey
1/2 peeled cucumber
3 drops of chamomile oil
Old School Oat & Honey Mask
2 tablespoons old-fashioned oats
2 tablespoons hot water
1/2 tablespoon honey
Smoothing Apricot Mask
2 pitted apricots
2 teaspoons greek yogurt
Olive oil

My Favorites

Baking Soda Scrub
I have been using a 3:1 mixture of baking soda and water for about 5 months, every other day on my face, elbows and knees because I have read in various cheesy magazines *cough*Seventeen*cough that using a baking soda paste safely brightens your skin, or at least takes the dull film off the top! I have noticed an honest improvement in the brightness of my skin and there has not been any irritation. There is a version of this that uses orange juice instead of water (here)and it is supposedly crazy amazing at getting rid of oil and blackheads. I’ll test this out and report back!

Cucumber Slices
Ever since I first started skipping sleep about 12 years ago, I’ve been using cucumber slices on my eyes when I wake up looking like I need another 3 or 4 hours in bed! While I know that everyone already knows this one, I’m crediting my mom because she was the first one to magically make me not look like a zombie at 6:30am after being up with a baby all night. (Thanks Mom!)

Egg White Masks
My aunt got me into egg white face masks even before I needed the cucumbers. She and my mom and I would spend nights putting egg white masks on each other’s faces and hands. Why hands? Both my mom and my aunt always rocked manicures so I guess it’s no surprise they made sure their hands were soft and smooth! These masks were fun for me as a kid because, aside from the gross fun of spreading egg whites with a pastry brush, there is the strange sensation of the eggs drying on your face and your feeling the pull. You can rinse it off in the sink or shower, but peeling it off was always more fun. I had forgotten about these masks until I thought about writing this post so I did one just to see how my skin felt immediately after and woah. Way, way smoother than pre-mask! All it takes is one egg white. I’ve read a lot of people use the yolk in their hair to make it shinier, but I have not tried that one myself yet!

In all the reading I did about DIY face masks I found so many amazing recipes I want to try out! Here are a few more!

Green Tea Face Mask
green tea (just enough to make a paste)
1 tablespoon sugar
1/2 tablespoon lemon juice
Banana Face Mask
1 banana
1 teaspoon honey
Blueberry Lemon Mask
4 tablespoons mashed blueberries
3 teaspoons ground oats
1 teaspoon finely ground almonds
2 teaspoons distilled water
1 teaspoon lemon juice
1 drop lemon essential oil
Papaya Mask
2 tablespoons mashed papaya
1/2 teaspoon pineapple juice
1 teaspoon powdered green algae
Pumpkin Facial
2 teaspoon pumpkin puree
1/2 teaspoon honey
1/2 teaspoon milk
1/4 teaspoon cinnamon
Nutmeg Honey Cinnamon Facial
2 tablespoons honey
1 teaspoon nutmeg
1 teaspoon cinnamon
No Comments